Helios: photo and RAW editor in your browser
Helios opens phone photos and camera RAW files, including CR3, NEF, ARW and DNG, right in your browser, with nothing to install and no account to create. You can fix the light and colour, crop and straighten the photo, apply one of 100 filters or copy the same settings to a whole set, then save the result as a JPG, PNG, WebP, AVIF or TIFF sized for email, a website or social media. Your files never leave your device.
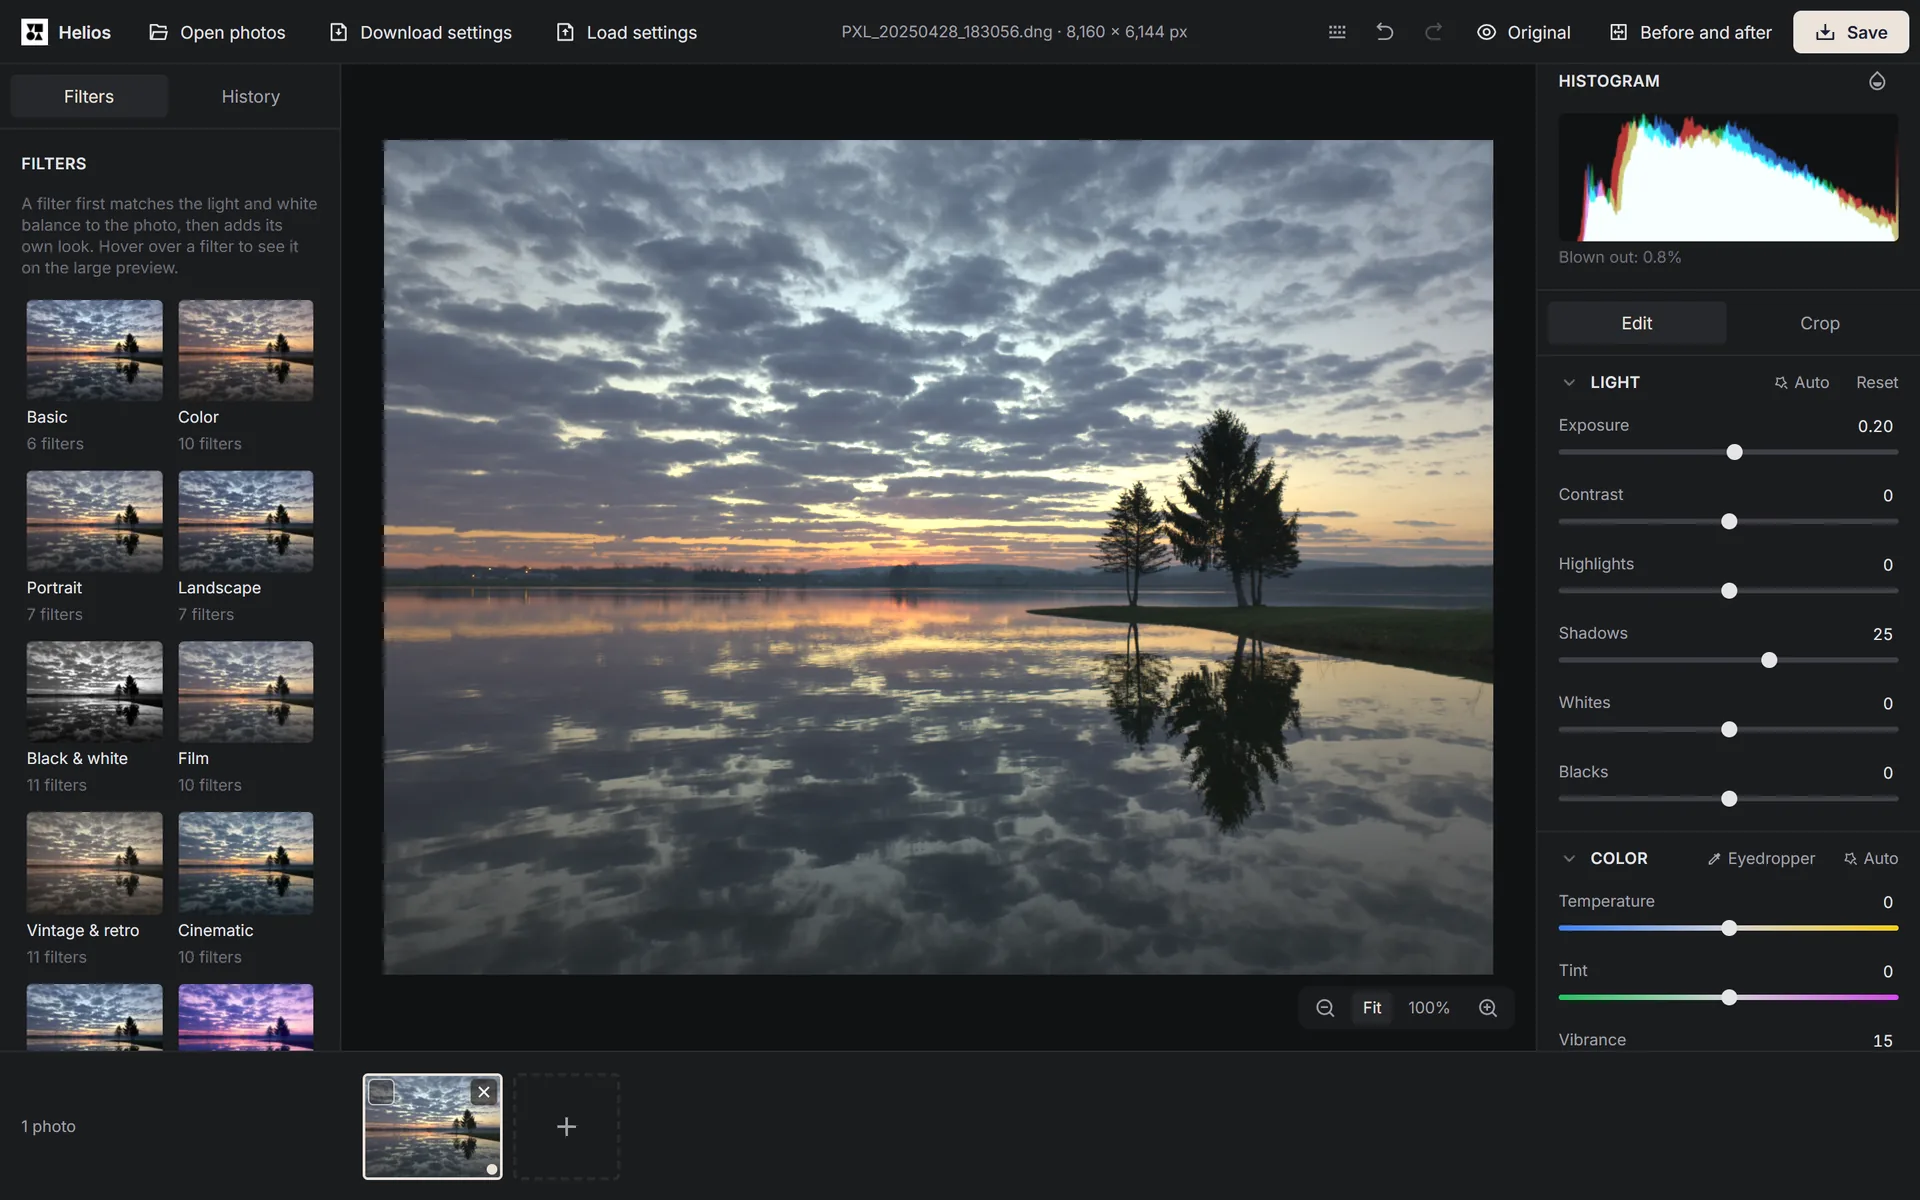
What can you do in Helios?
Helios is a photo editor that you open in your browser like any other web page. There’s nothing to install, no account to create and nothing to pay when you save. Your original file stays untouched, because saving always creates a new file.
In Helios you can brighten a photo that came out too dark and tone down a sky that’s too bright, remove a yellow or blue tint, crop the photo and level a crooked horizon, and sharpen it and reduce noise. There are 100 ready-made filters, and you can save your own. You can copy the settings from one photo to a whole set, for example all the photos from a wedding, and then save them all at once, sized for email, a website or social media.
The editor opens with the Open Helios button at the top of this page and fills the whole screen. The Arteon icon in the top left corner of the editor closes it and brings you back to this page. If you opened the editor with that button, your browser’s Back button does the same. Ads only appear in a separate column along the right edge of the editor, or in a narrow strip at the very bottom on phones and other small screens, so they never cover the photo or the buttons.
Which files can Helios open?
| Format | What you can open |
|---|---|
| JPG (JPEG) | Standard and progressive photos from cameras, phones and scanners, including black and white and CMYK images. Colours with a Display P3 profile (iPhone) or Adobe RGB profile are converted so they don’t look washed out, and the rotation saved by the camera is applied automatically. |
| HEIC | Photos from an iPhone or iPad, but only in a browser that can decode HEIC itself. From a HEIC sequence, the editor takes the first image. |
| RAW | Files from cameras and phones, including CR3 and CR2 (Canon), NEF (Nikon), ARW (Sony), RAF (Fujifilm), RW2 (Panasonic), ORF (Olympus) and DNG. DNG files with JPEG XL compression open up to 100 million pixels. |
| PNG | 8-bit and 16-bit files, with a colour palette or transparency, as well as animated PNGs. |
| WebP | Lossy and lossless files, with transparency, including animated ones. |
| AVIF | AVIF files in any browser that can decode them itself. From an animated AVIF, the editor takes the first image. |
| TIFF | 8-bit, 16-bit and 32-bit (HDR) files, compressed or uncompressed, in CMYK, with colour profiles and with multiple pages, such as scanned documents. |
| GIF | Still and animated GIFs, with transparency. |
| BMP | 24-bit files. |
Which cameras and phones have we tested Helios with?
| Camera or phone | File format |
|---|---|
| Cameras | |
| Canon EOS 6D | CR2 |
| Canon EOS R50 | CR3 |
| Canon EOS R6 Mark II | CR3 |
| Nikon Z 6 | NEF |
| Sony α7 III (ILCE-7M3) | ARW |
| Sony α7R IV (ILCE-7RM4) | ARW |
| Sony α7C (ILCE-7C) | ARW |
| Fujifilm X-T4 | RAF |
| Fujifilm GFX100 II | RAF |
| Panasonic Lumix S5 (DC-S5) | RW2 |
| Phones | |
| Apple iPhone 12 Pro | DNG |
| Google Pixel 7 Pro | DNG |
| Google Pixel 8 Pro | DNG |
| Samsung Galaxy S23 Ultra | DNG |
What is a RAW file, and how is it different from a JPG or HEIC?
A RAW file holds the unprocessed data from the camera’s sensor rather than a finished picture like a JPG or TIFF. Cameras usually record this data with 12 or 14 bits per channel, while a JPG has 8, so a RAW file holds a much wider range of brightness[1]. Turning the raw data into a photo is called developing[1]. You can develop the same file as many times as you like, with a different white balance each time, for example. A JPG can’t be turned back into RAW, because some of the data was thrown away when it was compressed.
Every manufacturer has its own format: Canon saves CR2 and CR3 files, Nikon NEF, Sony ARW, Fujifilm RAF, Panasonic RW2 and Olympus ORF[1]. So a NEF or CR3 file is simply a RAW file with its maker’s extension. DNG is an open RAW format created by Adobe[2], and phones such as the Google Pixel and Samsung Galaxy save their RAW photos as DNG. Most RAW files also contain a ready-made JPG preview, which the camera shows on its screen[1]. Helios uses it too: the photo appears after about 0.2–0.3 s, and editing starts once the editor has developed the whole file.
HEIC is the format that iPhone 7 and later, iPad (6th generation) and later and newer iPad Air, mini and Pro models use for photos when they run iOS 11 or later. It replaces JPG on these devices because it compresses better, so a photo takes up less space[3], but like a JPG it holds a finished picture rather than raw sensor data. If you’d rather your iPhone saved photos as JPG, open the Settings app, tap Camera, then Formats, and choose Most Compatible[3].
How do you open a CR3, NEF or HEIC file and save it as a JPG?
The same four steps work for every RAW file and for HEIC. You can open HEIC files in Safari 16.4 and later, and in Chrome and Edge when your system has an HEVC decoder. On Windows, the decoder comes from the paid HEVC Video Extensions add-on in the Microsoft Store[4]. In a browser without an HEVC decoder, such as Firefox, the editor shows a message telling you where the file will open.
1. Open the editor
Click Open Helios at the top of this page. The editor opens full screen and shows the list of formats it accepts.2. Add your file
Drag the file onto the editor, or click Open photos (Ctrl+O, or Cmd+O on a Mac) and choose the file on your computer or your camera’s memory card.3. Fix the photo if you want to
If the photo is too dark or the colours look off, click Auto in the Light section and then in the Color section. You can then fine-tune any slider yourself.4. Save it as a JPG
Click Save (Ctrl+S) and leave the Format field on Same as original: RAW and HEIC files are saved as JPG, because Helios can’t write those formats. Under What for, choose Full quality and click Save in the window. The file keeps the original name with a suffix, such as IMG_1234-helios.jpg. If all you need is to turn a batch of HEIC photos into JPGs without editing them, the HEIC to JPG converter is quicker.
How do you open a whole set of photos at once?
After clicking Open photos, select several photos in the file picker, or drag a whole set onto the editor. The empty editor says Drop photos here, and while you drag it shows Drop to add photos. You can add more files later with the plus tile (Add photos) at the end of the thumbnail strip at the bottom of the editor.
All the photos you choose appear in the thumbnail strip straight away, in the order you picked them, including those still opening, and the progress shows next to the strip, for example Opening photos: 3 of 10. The editor opens up to three photos at a time, depending on your processor cores and memory. Clicking a photo that’s still waiting opens it next, and closing a waiting photo stops it from opening. Thumbnails of RAW files come from the previews saved by the camera, so the strip fills up within a few seconds, before the whole set has opened. In our test, the editor opened a set of 200 photos of 800 × 600 px in 35 s, and the page responded to clicks the whole time.
An animated GIF, WebP or PNG and a multi-page TIFF open on their first frame or page. A row such as Frame 1 of 12 or Page 1 of 5 then appears under the histogram, with a Choose a frame or Choose a page button that shows all frames as thumbnails. You edit and save one frame or page at a time, as a regular photo without animation, and the frame or page number goes into the file name, for example scan-page-2-helios.png.
How do you brighten a dark photo and rescue an overexposed one?
The Light section on the right is open as soon as the photo loads. The easiest place to start is the Auto button: the editor sets the light for this photo, and you can then adjust any slider. The button brightens a dark photo, but it won’t darken a bright one that isn’t overexposed. It also makes sure the bright areas don’t blow out.
- Exposure brightens or darkens the whole photo at once, from −5 to +5. It’s the first slider to reach for when a photo is simply too dark or too bright.
- Contrast increases or reduces the difference between the light and dark parts of the photo.
- The Highlights slider only affects the bright parts. Moved to the left, it darkens a bright sky or window without darkening the rest of the photo.
- The Shadows slider only affects the dark parts. Moved to the right, it brightens a face or a building in a photo taken against the light.
- Whites and Blacks set the brightest and darkest points of the photo. They help when a photo looks grey and flat after your other changes.
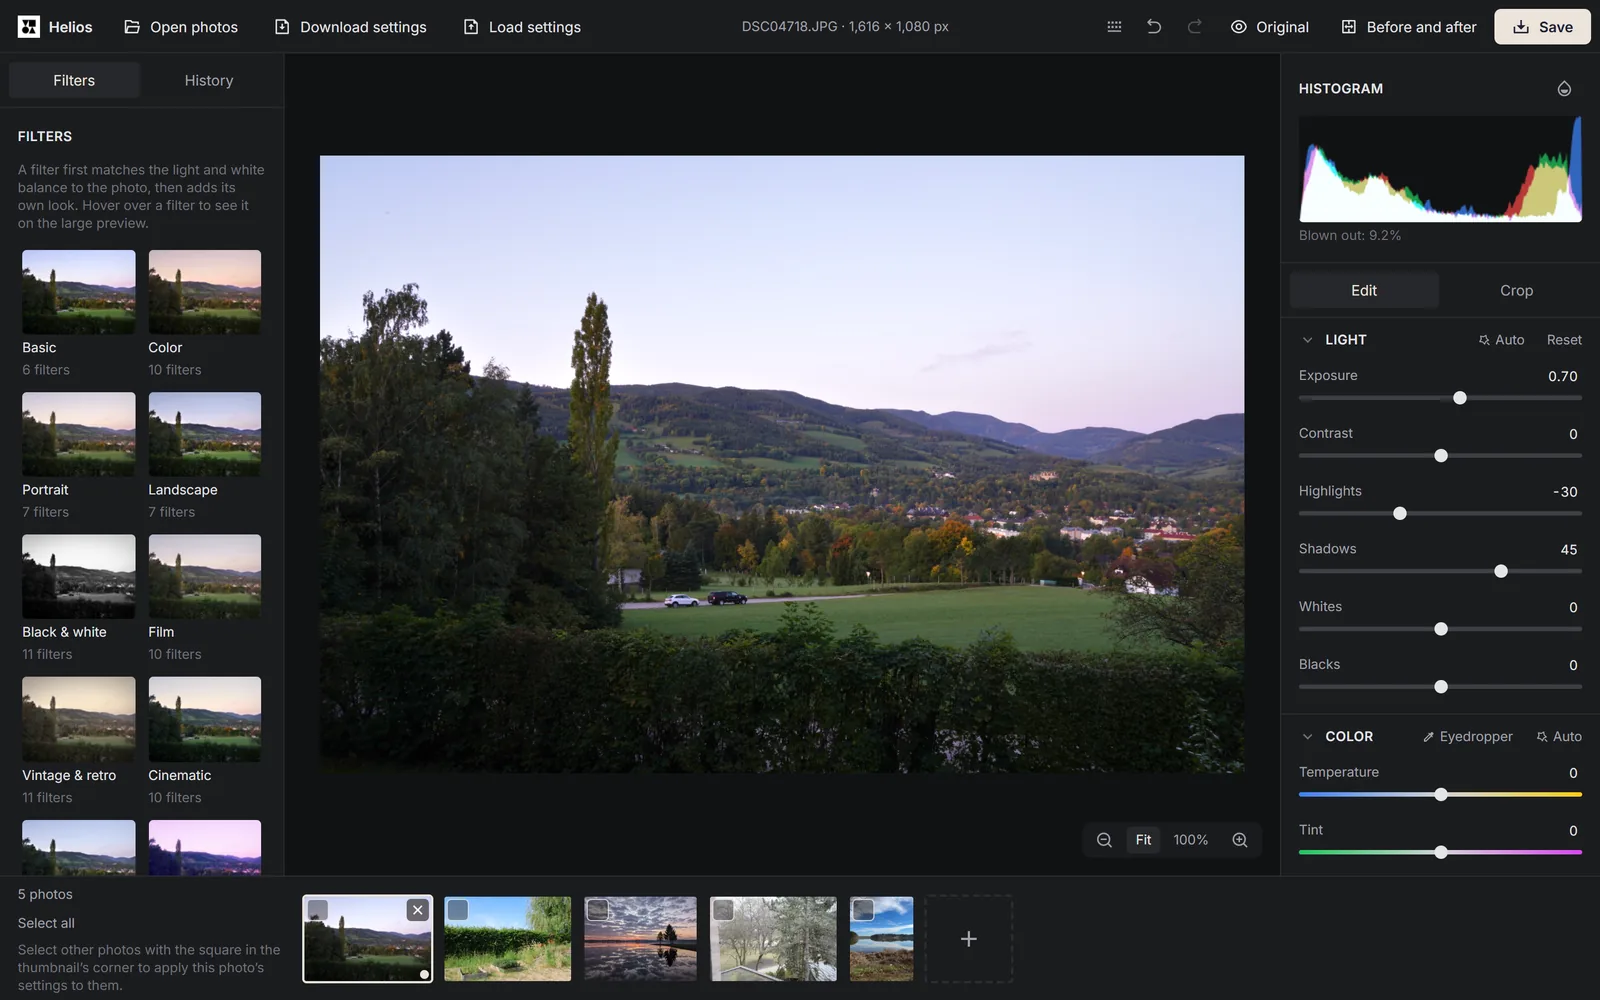
The other sliders in this section run from −100 to +100, and they all start at zero. Next to each slider there’s a number field where you can type an exact value. Double-clicking a slider sets it back to zero, the Reset button resets the whole section, and Restore original undoes every change to the photo.
Helios opens RAW files at 16 bits per channel. The brightest parts of the photo, which a normal development would turn pure white, then stay in the data as extra headroom, and the Exposure, Highlights and Whites sliders can use it without clipping. That’s why moving the Highlights slider to the left brings back detail in the brightest areas, which at 8 bits per channel would stay a flat grey patch. This applies to areas that only went past white during development. If the camera sensor itself clipped the light, there’s no detail in the file, so the editor can’t bring it back, but it does remove the purple tinge from those areas. A very large photo on a device with little memory opens at 8 bits per channel, and the editor tells you so once. Helios edits JPG, PNG, TIFF and other formats at 8 bits per channel.
How do you remove a yellow tint and fix the colours?
A yellow, orange or blue tint over the whole photo, which photographers call a colour cast, comes from the colour of the light the photo was taken in. A photo taken indoors under ordinary light bulbs comes out yellowish orange, and one taken in the shade on a sunny day comes out blue[5]. White balance corrects for the colour of the light so that neutral colours, such as white and grey, look right[6]. In the Color section there are three ways to do it:
- the Auto button sets the white balance for this photo, and when one strong colour dominates it, such as the brown of wood or the orange of a sunset, it keeps most of that colour;
- Eyedropper: click it, then click something in the photo that is actually white or grey, such as a sheet of paper, a wall or a cloud. The editor removes the cast, and the Esc key turns the eyedropper off. If the spot you click is too dark or the white is blown out, the editor asks you to pick another light grey spot;
- the Temperature and Tint sliders: Temperature shifts the colours between blue and yellow, and Tint between green and magenta.
The Vibrance and Saturation sliders change how strong the colours are. Saturation boosts every colour equally. Vibrance boosts muted colours more than ones that are already intense, and skin tones less, so faces stay natural.
How do you change a single colour or make a photo black and white?
The Color mixer section changes only the colour you pick and leaves the rest of the photo alone. At the top of the section you choose what to change: Hue shifts the shade of a colour, Saturation changes its strength, and Luminance makes it lighter or darker. Below that are eight sliders, one per colour band: Red, Orange, Yellow, Green, Aqua, Blue, Purple and Magenta. For a deeper blue sky, choose Luminance and move the Blue slider to the left. To make grass less vivid, choose Saturation and move the Green slider to the left.
The Black & white switch in the same section turns the photo black and white. The luminance sliders then decide how light each colour comes out: darkening the Blue band gives a darker sky, and lightening the Orange band gives lighter skin in a portrait.
How do you sharpen a photo and reduce noise?
The Detail section has four sliders. Sharpening brings out edges, and Noise reduction smooths the fine grain you see in photos taken in low light; both run from 0 to 100. Texture strengthens or softens fine detail, such as the texture of skin, fabric or bark. Clarity changes the contrast of larger shapes in the midtones, which makes the photo look crisper or softer.
Sharpening and noise reduction work on the original’s pixels, so on the scaled-down preview of the whole photo they look different from the saved file. You’ll judge them best at 100% zoom, which shows one photo pixel per screen pixel.
The zoom buttons are in the bottom right corner of the photo. Fit shows the whole photo on screen, and 100% shows the real pixels from the full resolution. The Z key switches between these two views. The Zoom in and Zoom out buttons and the + and - keys change the zoom by one step: 25%, 50%, 100%, 200%, 400% or 800%. The preview at 100% matches the saved file: our automated test compares them pixel by pixel at different settings, including RAW files opened at 16 bits, and finds no difference greater than 2 brightness levels out of 255. After a photo is rotated, the difference on sharp edges goes up to 3 levels.
How do you add a vignette, grain or a film look?
A vignette is a darkening of the edges of the frame. In a lens it’s usually a flaw, but photographers sometimes add it on purpose to draw attention to the centre of the picture[7]. In the Effects section, the Vignette slider darkens the edges when you move it to the left and lightens them when you move it to the right. Once the vignette is on, the Size, Feather, Roundness, Horizontal position and Vertical position sliders appear. You can also move the vignette by dragging the Vignette center point on the photo or with the arrow keys. The Grain slider in the same section adds fine grain, like a photo shot on film.
The Color grading section gives the shadows and highlights a tint without changing the photo’s brightness. You pick the tint with the Shadows hue and Highlights hue sliders, set its strength with Shadows saturation and Highlights saturation, and the Balance slider moves the boundary between shadows and highlights. By default the shadows hue is set to a cool blue and the highlights hue to a warm orange, so raising both saturation sliders is enough for the film look of cool shadows and warm highlights. The shadows hue tints skin tones less, so a face in the shade changes colour less than the background.
How do you crop and straighten a photo?
The crop always stays fully inside the photo, so straightening never leaves empty corners. You can undo crop changes just like any other change.
1. Switch to Crop mode
Click Crop above the sections on the right, or press C. A frame with handles at the corners and edges appears on the photo.2. Choose an aspect ratio
Under Aspect ratio, click Free, Original, 1:1, 4:5, 3:2 or 16:9. The icon next to the label, the Swap portrait and landscape button, turns the frame around, for example from 3:2 to 2:3.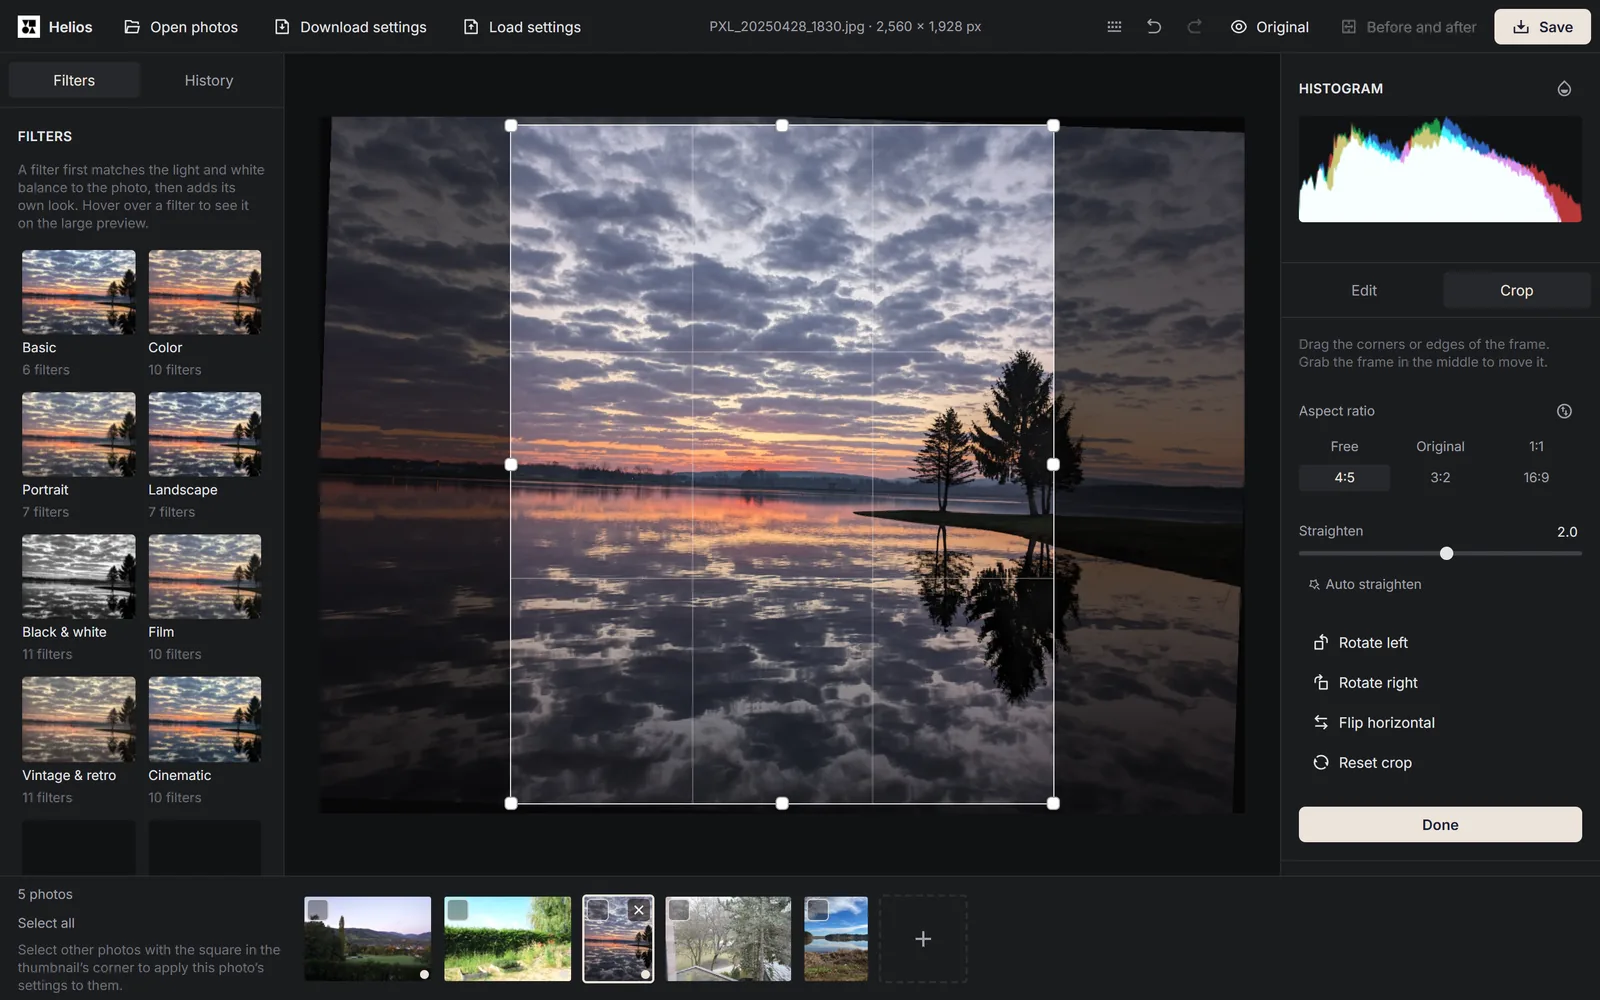
The lake photo has a 4:5 crop frame, and the Straighten slider rotates it by 2°. The grid splits the frame into thirds horizontally and vertically, which helps you line up the horizon and the trees. Screenshot: Arteon, photo: raw.pixls.us, CC0 3. Position the frame
Drag the corners or edges of the frame, and move the whole frame by grabbing it in the middle. You can also move the frame with the arrow keys.4. Level the horizon
The Straighten slider rotates the photo by up to 45° either way. The Auto straighten button looks for a horizon or vertical edges in the photo and suggests an angle, which you can then adjust with the slider. If it can’t find any, the editor asks you to set the angle with the slider.5. Rotate, flip and confirm
The Rotate left and Rotate right buttons turn the photo by 90°, and Flip horizontal mirrors it. Reset crop goes back to the whole photo, and Done or the Enter key applies the crop.
How do you check whether a photo is overexposed?
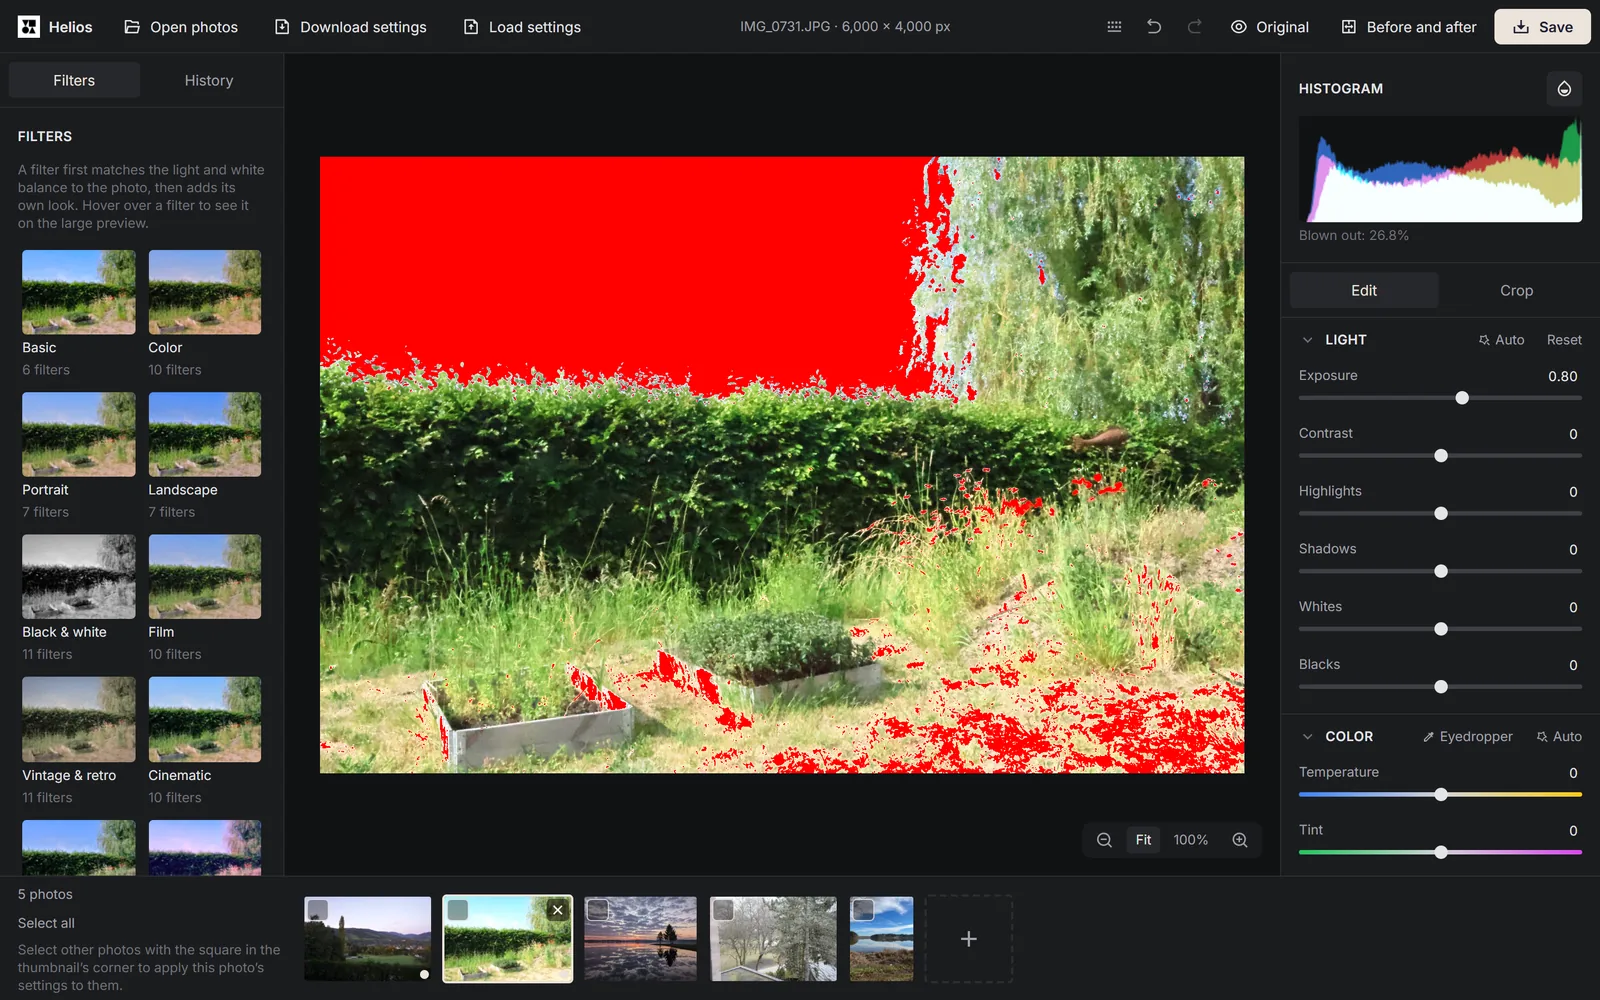
Above the sections on the right is the Histogram, a chart of how many pixels there are at each brightness, from the darkest on the left to the brightest on the right. It updates live as you move any slider. When at least 0.1% of the photo is blown out, meaning at least one colour has hit its maximum and the detail is gone, a note appears under the histogram, for example Blown out: 2.4%.
The Show clipping button, the icon next to the Histogram label (J key), marks blown-out areas on the photo in red and completely black ones in blue. That way you can see straight away whether brightening the photo has wiped out detail in the clouds or on a white shirt. To compare the result with the original, hold down the Original button on the top bar or the \ key. Let go to see your version again.
How do you compare a photo before and after your edits?
Click Before and after on the top bar, next to the Original button, or press Y. A vertical line appears on the preview: to its left you see the unedited photo, and to its right the photo with your changes. The labels Before and After sit in the top corners.
You can drag the line with your mouse or finger. With the keyboard, press Tab to reach its handle, the Before and after divider slider, and then move the line with the arrow keys. The arrow keys don’t switch photos while the handle is selected. The line stays in the same place on screen when you zoom in, move the photo or go to the next one, even from a landscape photo to a portrait one. Both sides of the line have the same crop and straightening.
The comparison is off in Crop mode: the button is greyed out, and the Y key does nothing. When you go back to editing, the line comes back. Holding the Original button shows the whole unedited photo even while the comparison is on, and you turn the comparison off by clicking Before and after again or pressing Y. The comparison doesn’t change anything in the photo, so the saved file and the histogram ignore it. For the same reason, it also works in a tab that’s only viewing work opened in another tab.
On screens narrower than 640 px, the Original, Before and after and Save buttons show icons only, so the bar fits without scrolling from a width of 360 px. Screen readers still read out their names.
How do you undo a change?
The Undo button on the top bar or Ctrl+Z undoes your last change, and Redo or Ctrl+Shift+Z (or Ctrl+Y) brings it back.
The History panel on the left lists every step under a clear name, such as Exposure +0.50, Crop or Filter: Summer. Clicking any step takes the photo back to how it was at that moment. Several moves of the same slider within 1.5 s count as one step, so small tweaks don’t flood the history. The history keeps 200 steps, and after you close the tab at most 100 of them remain: the first step, Opened, and the last 99.
How do you apply a filter and save your own?
The Filters panel on the left has 100 filters in twelve categories: Basic (6), Color (10), Portrait (7), Landscape (7), Black & white (11), Film (10), Vintage & retro (11), Cinematic (10), Night & city (5), Neon & futuristic (10), Artistic (8) and Dreamy (5). Each category has a tile with a thumbnail of your photo in one of its filters. Clicking a tile opens the category, and the All categories button or the Esc key takes you back to the list. The filter thumbnails are rendered from your own photo, and hovering over a filter shows it on the large preview before anything changes. A click applies the filter. Each filter first sets the light and white balance the same way as the Auto buttons in the Light and Color sections, and then adds its own look. If a ready-made filter would blow out part of the photo, the editor moves the Whites slider to the left, and the Exposure slider too if needed, only as far as necessary. The Filter strength slider weakens or strengthens the filter, from 0 to 150%.
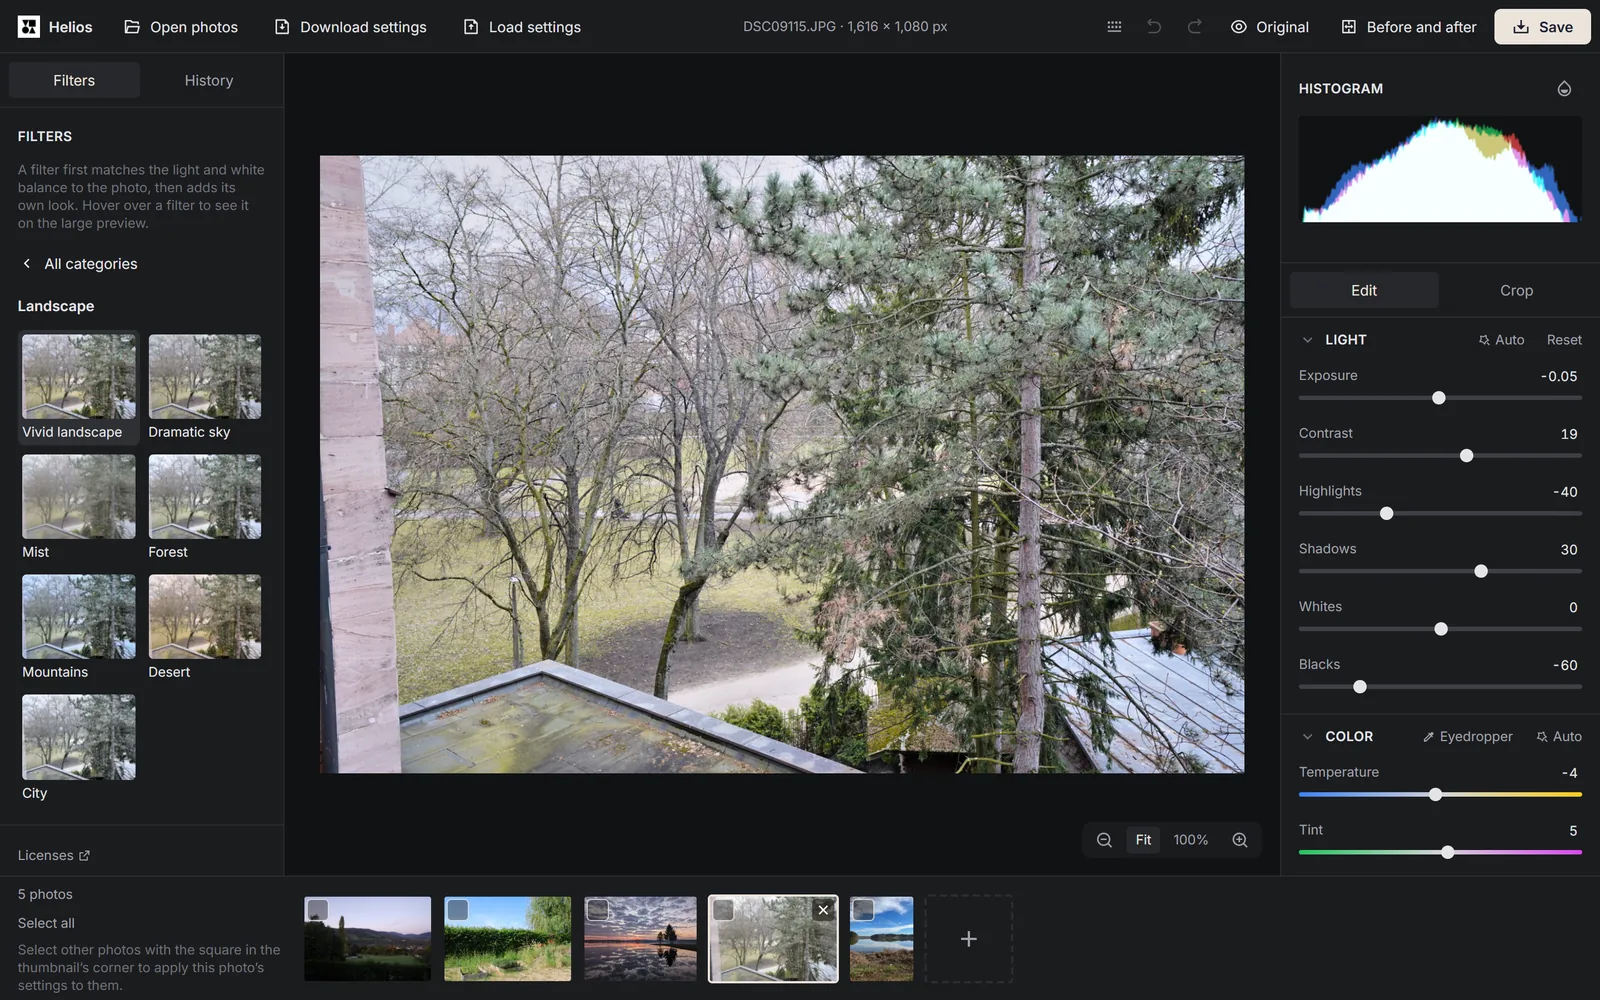
The filters in the Neon & futuristic and Artistic categories change the look of a photo dramatically. Some filters in these and a few other categories add an effect you can’t set with the sliders, for example colours like those of a thermal camera, a glow around bright areas, red and blue fringes along edges, or horizontal lines like on an old TV screen. The Color grading section then shows a reminder about the effect, and that section’s Reset button removes it together with the colour grading.
You can save your own look with the Save the current look as a filter button. The filter remembers the light, colour, the Texture and Clarity sliders, colour grading, effects and colour mixer, while sharpening, noise reduction and the crop stay with each photo. Your own filters appear in the My filters category, where you can delete any of them. The Download my filters button saves them to a file, and Load filters from a file brings them back on another computer or in another browser. In a private window, the browser doesn’t let you save a filter permanently: it works until you close the tab, and the editor suggests downloading your filters to a file.
How do you edit many photos at once?
You can copy the settings from one photo to as many others as you like. This is useful for a set from one shoot, such as a wedding or a trip. To copy them to just one other photo, click Copy settings at the bottom of the right panel (Ctrl+C), go to the other photo and click Paste settings (Ctrl+V). Pasting copies the photo’s whole look, meaning the light, colour, detail, colour grading, effects and colour mixer, while the crop stays with each photo.
1. Edit one photo from the set
Open the whole set, pick the photo in the thumbnail strip at the bottom of the editor that best represents the shoot, and edit it. The left and right arrow keys switch between photos.2. Select the others
Click the square in the corner of the thumbnail of every photo that should get these settings, or click Select all. The Deselect button clears the selection.3. Choose what to copy
Click Apply settings to selected. In the Which settings should be applied? window, every group is ticked except Crop and rotation. You can add the crop yourself, but it only fits photos with the same aspect ratio and composition, and the window reminds you of this.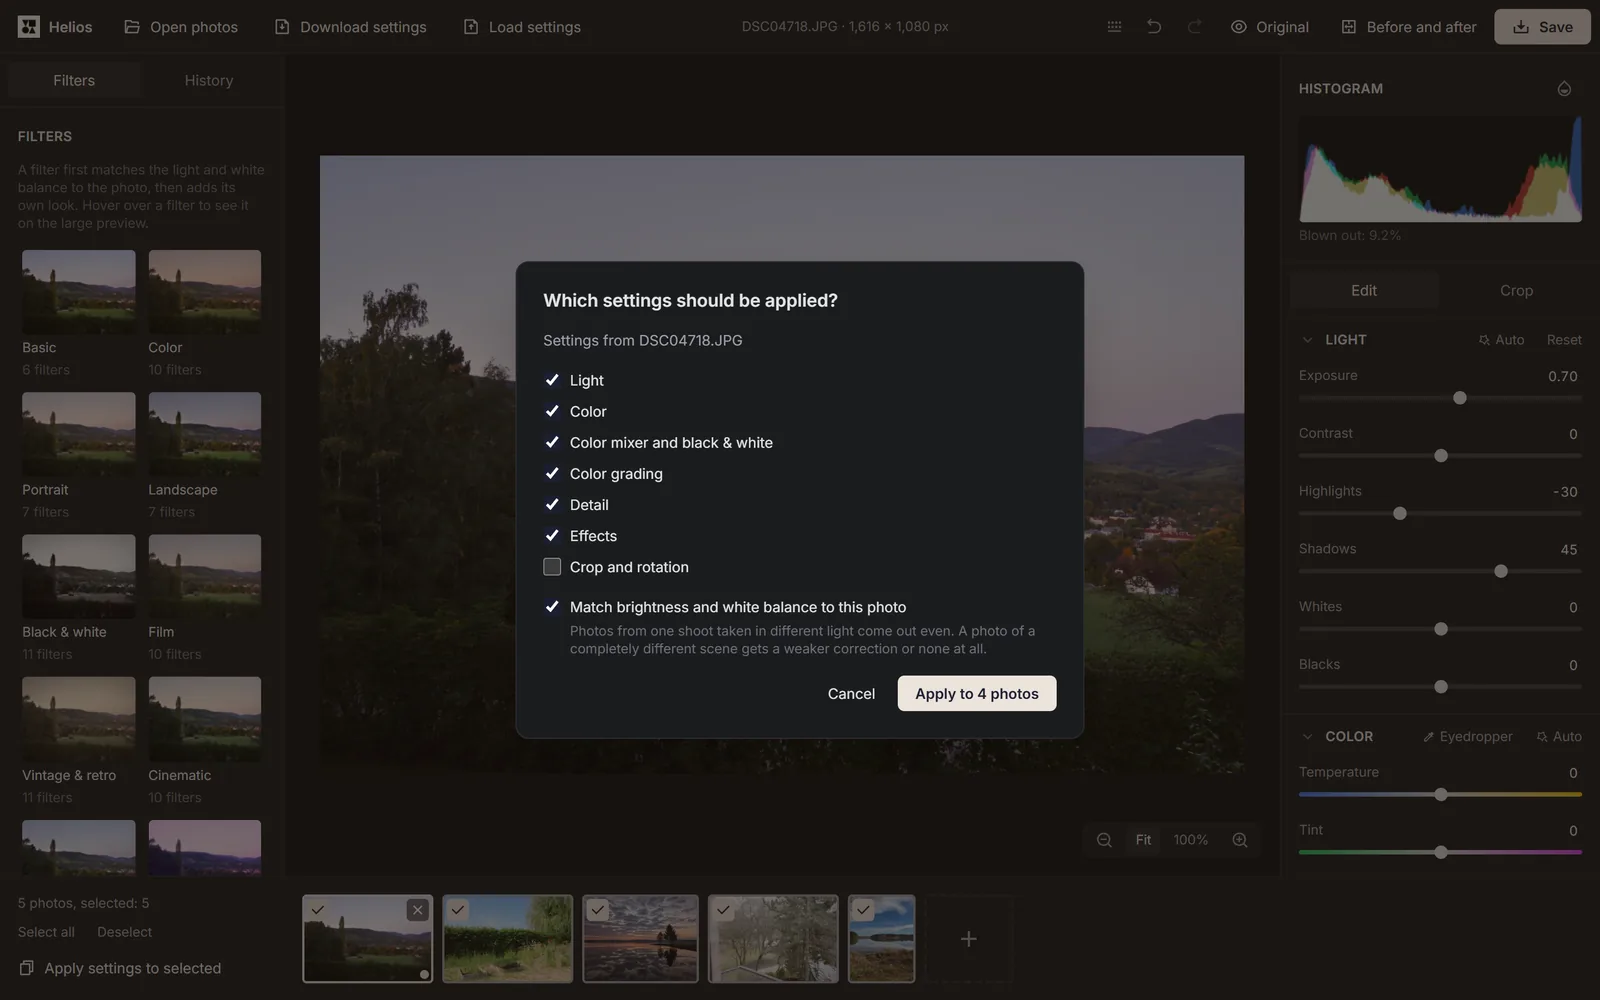
The window has Match brightness and white balance to this photo ticked, along with every settings group except Crop and rotation. Five photos are selected at the bottom, so the Apply to 4 photos button copies the settings from DSC04718.JPG to the other four. Screenshot: Arteon, photos: raw.pixls.us, CC0 4. Even out the brightness of the set
Leave Match brightness and white balance to this photo ticked. Photos from the same shoot taken in different light then come out even, while a photo of a completely different scene gets a weaker correction or none at all. For JPG, HEIC, TIFF and other formats except RAW, the editor also takes into account the difference in exposure from the shutter speed, aperture and ISO saved by the camera. This option works when you copy Light or Color.5. Apply and save the set
Click the button with the number of photos, for example Apply to 12 photos. You can still fine-tune each photo afterwards, and you can save the whole set in one ZIP file by choosing Selected or All in the save window.
How do you save a photo for email, a website or printing?
| What for | Size and quality | When to choose it |
|---|---|---|
| Full quality | The photo is saved at full resolution, at 95% quality. | Choose it for archiving, for printing and when you’ll edit the file further. |
| Website and email | The long edge of the photo is 2048 px, and the quality is 85%. | Choose it when you email photos or put them on a website. A 24 MP camera photo (6000 × 4000 px) scaled down to 2048 × 1365 px has more than 8 times fewer pixels, so the file is much lighter. |
| Social media | The photo is 1080 px wide, and the quality is 90%. | Choose it for posts and stories on social media. |
| Custom settings | You set the quality from 50 to 100%, and the size as Full resolution, Long edge in pixels or Width in pixels. | Choose it when you need an exact size or a smaller file. |
Which format should you save a photo in?
| Format | What you get |
|---|---|
| JPG | The most universal file, with camera data, which any program can open. It’s small but loses a little quality, and a transparent background turns white. |
| PNG | A file with no loss of quality, with transparency and camera data, but a large one. |
| WebP | A file smaller than a JPG at similar quality, with transparency and camera data. Some older programs can’t open it. |
| AVIF | The smallest file at good quality, with transparency and camera data. Saving takes longer, and not every program can open it. |
| TIFF | A file with no loss of quality, with LZW compression, transparency and camera data, for printing and archiving. |
| BMP | A very large uncompressed file with no camera data, and a transparent background turns white. |
| GIF | Up to 256 colours, so the photo loses its smooth gradients. The file has no camera data. |
What happens to your file, camera data and GPS location?
Your photos never leave your browser. Helios opens, edits and saves them on your device, so no file is sent to a server, not even for a moment.
Cameras and phones store Exif data in each photo: the camera model, shooting settings such as shutter speed, aperture and ISO, the date the photo was taken and often the GPS coordinates of where it was taken[8]. The Keep camera data (without location) option in the save window is on by default. It copies the camera model, lens, date and shooting settings to the new file, and it always removes the GPS location, the camera and lens serial numbers and the manufacturer’s own data (MakerNote). With this option turned off, the saved file contains no camera data or GPS location.
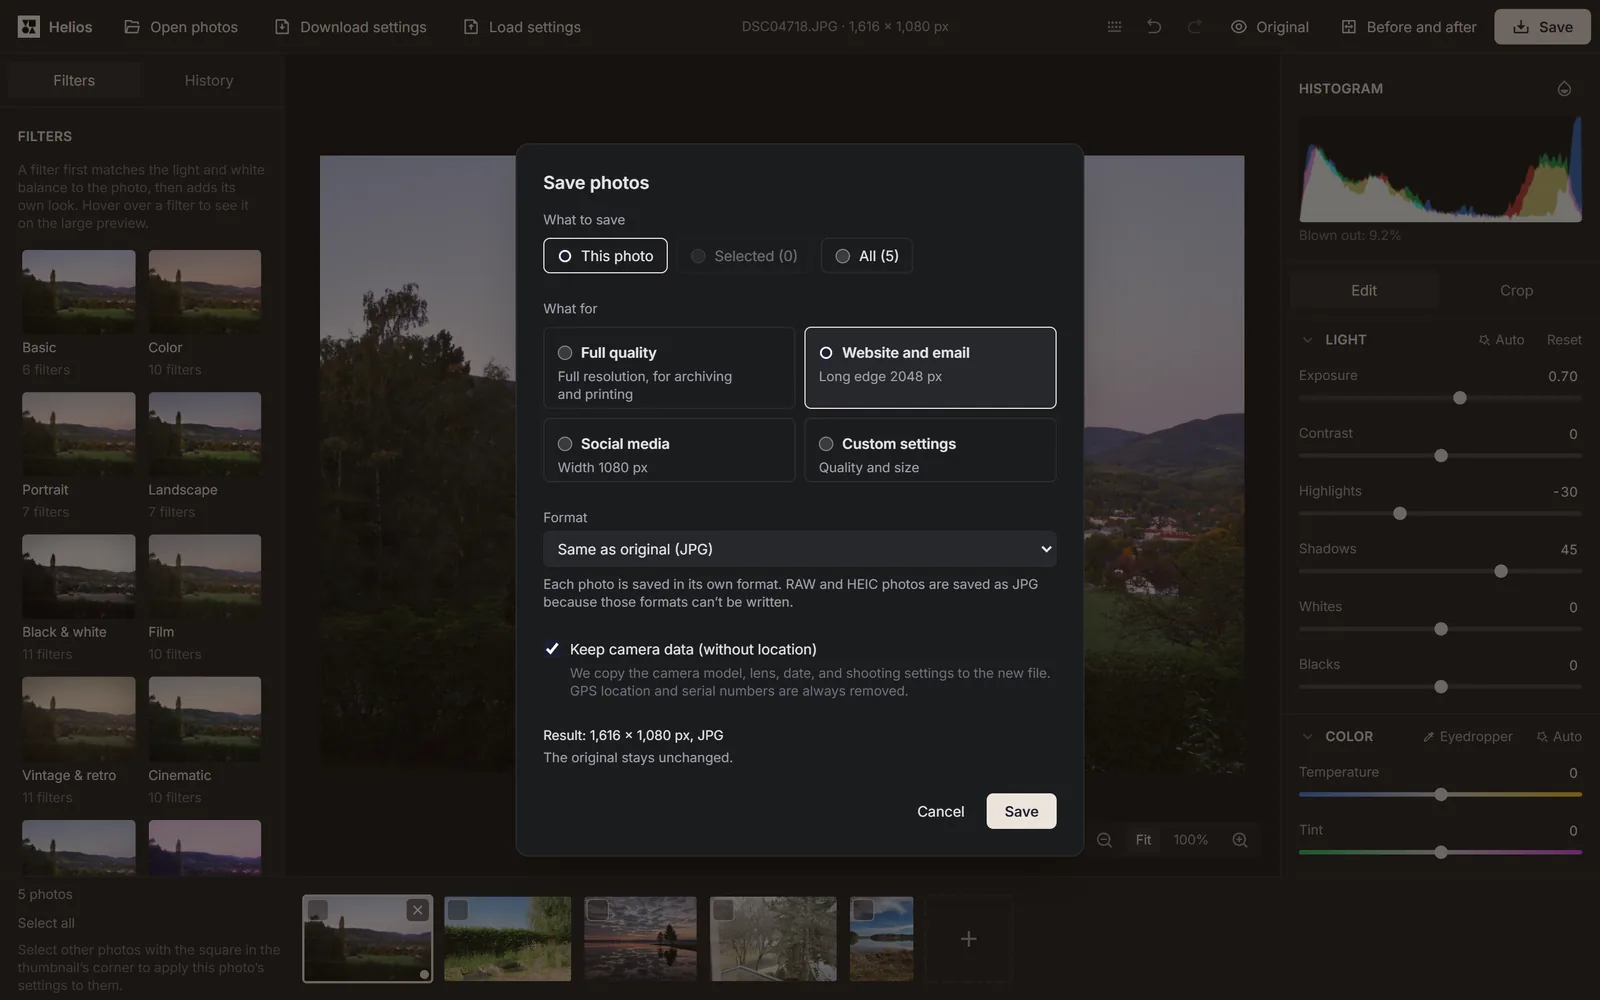
If you only want to remove the location from a photo before sending it on, open it in Helios and save it without changing anything. The new file keeps the date and camera settings but has no GPS coordinates. A JPG is re-saved in the process, at 95% quality with the Full quality purpose, so if every detail matters, choose PNG or TIFF as the format.
Where is your work saved, and how do you get back to it?
Every change is saved automatically in your browser, along with a copy of the original. When you come back to Helios in the same browser, the editor shows Pick up where you left off with the number of photos and the date of the last change. Continue editing brings your work back, and Start over deletes the saved work and opens an empty editor.
This copy only lives in the website data in your browser, so it disappears when you clear your browsing data. Safari deletes a website’s data after 7 days of browser use without a visit to that website[9], so with your first photo in Safari the editor warns you about this once. In a private window, the browser doesn’t let your work be saved, so the editor works but your changes are lost when you close the tab. If the browser runs out of space for a copy of a large original, your settings are still saved, and after you close the tab you only need to open that file again to get your edit back.
To keep your settings longer or move them to another computer, save them to a file. The Download settings button on the top bar saves the settings of all open photos, and Load settings restores them to photos with the same name and file size. The message after loading tells you how many photos the settings applied to and which photos from the file are missing.
If you open Helios in two tabs, only one of them edits. The other shows a message that the editor is open in another tab and you can only view it there, with a Work in this tab button. That button takes over editing, along with the latest change from the other tab. When the tab that’s editing is closed, the next one takes over.
What keyboard shortcuts does Helios have?
| Key | What it does |
|---|---|
| Ctrl+O | Opens the file picker for photos. |
| Ctrl+S | Opens the Save photos window. |
| Ctrl+Z | Undoes the last change. |
| Ctrl+Shift+Z or Ctrl+Y | Redoes an undone change. |
| Ctrl+C | Copies the photo’s settings when no text is selected on the page. |
| Ctrl+V | Pastes the copied settings onto the photo you’re viewing. |
| Left arrow and right arrow | Switch to the previous and next photo. |
| \ (held down) | Shows the unedited photo for as long as you hold it. |
| Y | Turns the Before and after view on and off. |
| J | Turns Show clipping on and off. |
| C | Switches Crop mode on and off. |
| Enter | Applies the crop. |
| Esc | Stops the eyedropper or cropping, or closes a window. |
| Z | Switches between the whole photo and 100% zoom. |
| + and - | Zoom in and out by one step. |
| ? | Opens the Keyboard shortcuts window with every shortcut. |
Which browsers does Helios work in, and what are its limits?
| Browser or limit | How Helios works |
|---|---|
| Chrome and Edge | You can open every format on the list, and HEIC when your system has an HEVC decoder. On Windows, it comes from the HEVC Video Extensions add-on. |
| Firefox | You can open every format except HEIC. RAW files take several times longer to open than in Chrome and Edge, and the editor tells you so with the first one. |
| Safari | You can open every format, and HEIC from version 16.4. In Safari 15.0 to 16.3 (older iPhones and Macs), photos, including RAW files, open, edit and save in all seven formats, but HEIC files don’t open. |
| Browser without WebGL2 support | The editor won’t run and shows a list of browsers it works in. |
| Photo size | A photo can have up to 268 million pixels (16,384 × 16,384). Panoramas open up to 65,535 px on the long edge. |
| File size | A file can be up to 2 GB. |
| Saving a large photo | Helios saves at full resolution up to 65,535 px per side. WebP (16,383 px), AVIF (32,768 px) and JPG (65,500 px) have lower limits per side, so save a larger photo as a PNG or TIFF. Full-resolution saving also works on iPhone and iPad, because the editor puts a large photo together from pieces. |
What does an editor message mean, and what should you do?
| Message | What to do |
|---|---|
| … is empty (0 bytes) | A file is usually left empty after an interrupted download or copy, so copy it again. |
| … can’t be opened | The file isn’t a photo in a format the editor accepts, even if it has a photo extension. Check that it’s the right file. |
| … is damaged or incomplete | Copy the file again from your camera, phone or drive. |
| The end of … is missing | The editor opened whatever survived in the JPG. If part of the photo is grey, copy the file again. |
| This browser can’t read HEIC photos | Open the file in one of the browsers the message lists. |
| … has more pixels than the browser can safely hold | Make the photo smaller in the program it came from, and open it again. |
| … is larger than 2 GB | Save the photo as a smaller file, as a JPG for example, and open it again. |
| The browser ran out of memory while opening … | Close other photos or browser tabs and try again. |
| The decoder needed for … didn’t load | The internet connection dropped while the decoder was downloading, and the file itself is fine. Open it again. |
| The … encoder didn’t load | The encoder for AVIF, TIFF, BMP and GIF only downloads the first time you save in that format, so it won’t load without an internet connection. Check your connection and save again, or refresh the page. |
| The result would be too large for the browser | Choose a smaller size in the save window. |
Sources
- Raw image format — Wikipedia
- Digital Negative — Wikipedia
- Using HEIF or HEVC media on Apple devices — Apple Support
- HEVC Video Extensions — Microsoft Store
- Color temperature — Wikipedia
- Color balance — Wikipedia
- Vignetting — Wikipedia
- Exif — Wikipedia
- Full Third-Party Cookie Blocking and More — WebKit
Every figure in the tables was computed from the unit definitions and checked arithmetically before publication. Historical values and the names of local units come from the sources listed above.
Content last reviewed: · written and checked by the Arteon team
Frequently asked questions about Helios
What can’t Helios do?
Helios edits the whole photo at once. It has no layers, no text tool, no brush for fixing a single spot and no tool for removing people or objects from a photo. It doesn’t save animations either.
Why does a DNG from a Google Pixel phone look flatter in Helios?
The phone saves not only the raw data in the DNG file but also its own corrections and colour profile. Helios applies the brightness corrections for the corners that the phone saved, but it doesn’t apply the colour profile from the file, which is why a photo from a Pixel 8 Pro looks flatter and cooler in Helios than in programs that use that profile. The Contrast and Vibrance sliders will add punch, and moving Temperature to the right will warm it up.
How many photos can I open at once?
Helios has no limit on the number of photos. Editing works on a screen-sized preview, and the full resolution only loads for zooming in and saving, so an open set doesn’t fill your computer’s memory. The previews of the three most recently viewed photos stay in memory, and the others reload when you go back to them.
Help us improve Helios
Have an idea for a new feature, found a bug, or does a file from your camera not open properly? Get in touch.